Starting a fermentation indigo vat in Japanese is called building Indigo (藍建て). Although our indigo vat is built now, it was quite a journey. Here I try to look back the process and note what could be done differently next year.
Our recipe for this year is based on the recipe on the book “Journeys in Natural Dyeing” by Kristine Vejar, Adrienne Rodriguez and Sarah Ollikkalla Jones, and adapted to 70L vat we have by Melanie.
- 3.5 kg of sukumo (we bought this from Japan)
- 100g of limestone/ calk / Ca(OH)2/ Calcium Hydroxide
- 40L ash water #1 strongest and used for step 1 and for topping off vat after dyeing, pH 12 or above
- 40L ash water #2 weaker and used for aidate step 2 around pH 11
BEFORE STEP ONE
-make two levels of Ash water >> I made this with hardwood ash from a friend, it became ~PH13, and as it is not so easy to make hot water at the garden, I did not have weak PH ash water. For next year, it will be good to start preparing the ash water earlier and have enough weak ash water. In general, ash water making (or boiling large amount of water) is very time consuming.
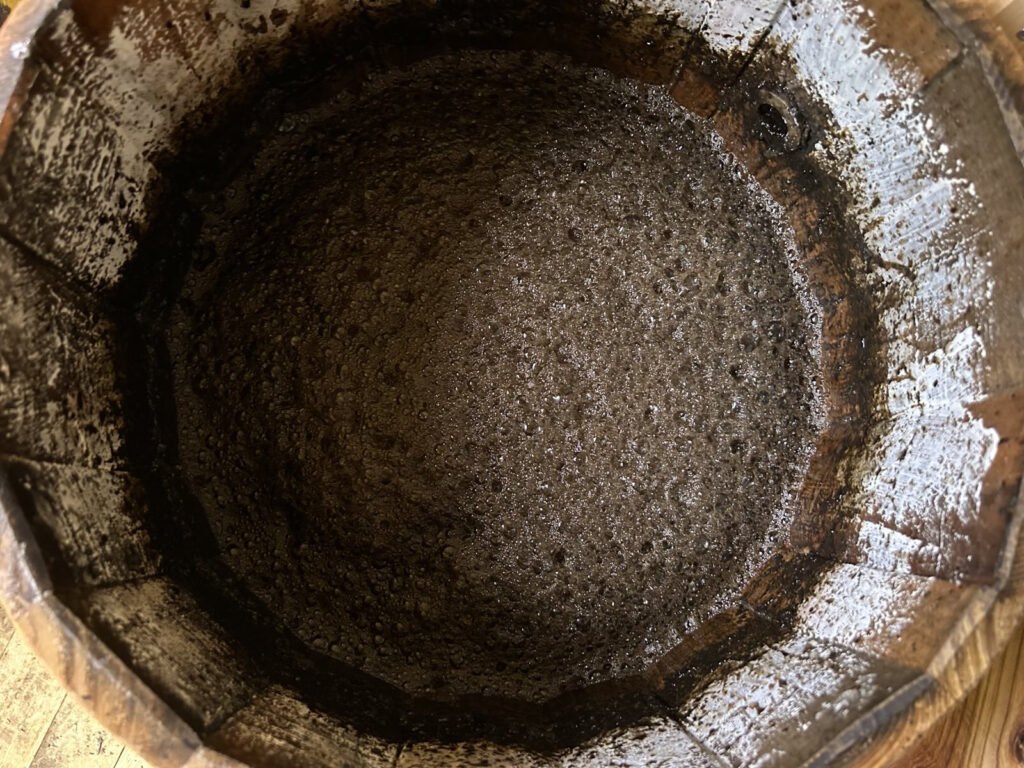
-prepare the vat >> The wood barrel came just in time for vat building. I filled the wood barrel with water over night so the wood expands and become water tight (this was in instruction of the barrel I bought). Then I emptied the barrel and painted the surface of the barrel with 50g of calk mixed with water (this is like white paint) with a brush.
STEP 1: Day1
*sukumo + 5L of strong ash water (45-50degrees)+ 100g of limestone >> I skipped the 100g limestone on the first vat as I thought I had painted the barrel with the limestone and this will come into the vat. 2nd Vat had this 100g limestone, and it seemed to be the problem (PH then became too high) We should skip this 100g limestone next time.
The 2nd vat building had problem with the cooker and the Ash water added to the sukumo was not very hot (maybe ~30-35 degrees). This was also a mistake in retrospect.
When we were making the 1st Vat, we were also cooking the ash water on the side, and the ash water added to the Sukumo for the first time (the first 5L) was quite hot, maybe over 50 degrees. We were excited enough people, so we also mix/kneed it very well at this point and left it for 1-2h in this sticky gue state.
>> Learning: The ash water added to the sukumo can be quite hot, probably over 50 degrees to make sure the bacterial in the sukumo is activated. Do not add limestone at this moment, but rely on PH of the ash water. Make sure to use strong ash water.
STEP 2: Day1 (after 1-2h)
-ADD about 30L #2 Ash water @ 45-50 degrees – this will bring level to about half of the vat >> The first vat had a successful process up to this. I remember checking the PH and it was looking good (don’t remember but should have been above 10) so I decided not to add limestone. As I skipped the 100g limestone, I was planning to add it at this point if the PH was too low.
For the second vat, this ash water was too cold (30-35 degrees) and in retrospect, it felt like the Sukumo was never activated.
STEP 3 Day1, just after step2
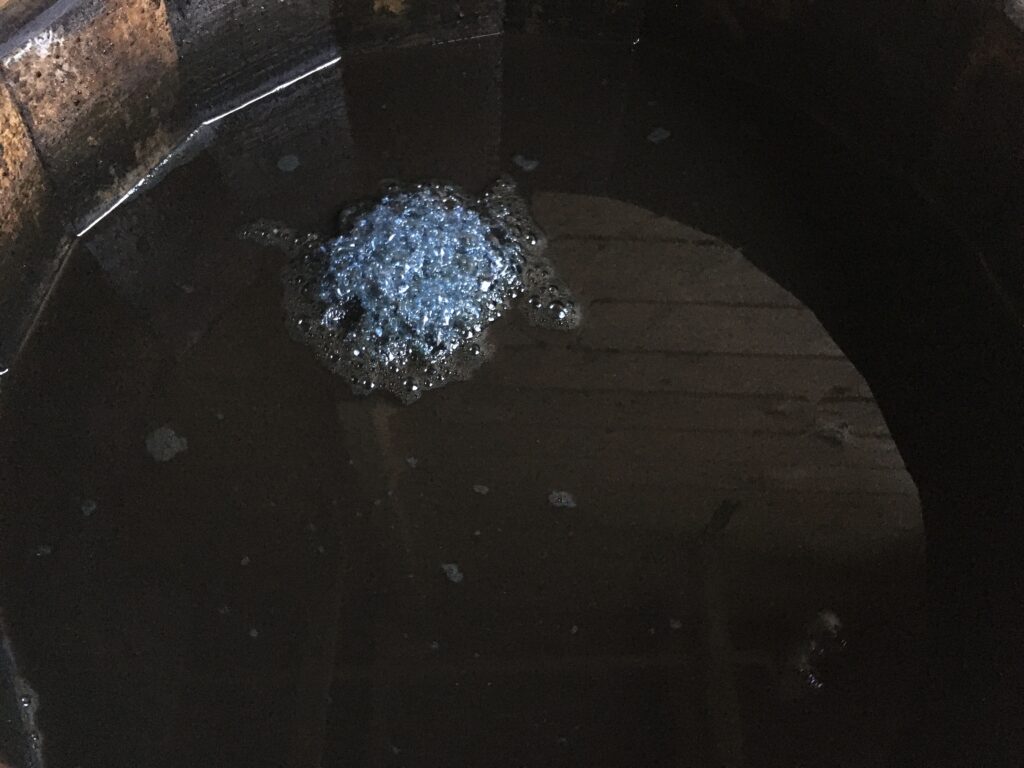
Mix vigorously 30x to the right, 30x to the left then 30x to the right again >> it was good to watch the mixing video from Melanie and we learned the mixing technique. Some people called it a “galaxy mix” as the bubble at the end looks like a galaxy.
IF hot season and things are sticking to side of vat, wipe with a clean cloth (this will avoid bacteria from growing on sides of the vat) >> we did not do this, but the side of the vat was painted with the limestone.
STEP 4 Day1, just after step3 (or prepare after step1 and cool it on the side)
– Cook wheatbran porridge( 140g wheat bran cooked in 750cc strong ash water), then cool it to 50 degrees and add to the vat. >> I bought “Weizenkreie” from bio/health shop, and this was different from what I was using earlier. Later I noticed what I was normally buying was not “Weizenkreie” but “Weizenkaime”, which is more of a food than the bran. Not sure what difference it would have made… when we run out of the Weizenkreie”, and when the vat was not doing good, I fed “Weizenkaime” instead.
I guess this feeding step was ok, and we can do the same next time.
after feeding, DO NOT MIX
From the Day2, we mixed 2 times a day, 8 hours in between. This was a bit tricky as the opening time of the Friedhof is limited (8am to 8pm, and I could only manage to go 9am or later in the morning, Madlen had to rush before they close at 8pm or you get locked in!)
The vat1 felt really good for the first week, it stayed around PH11, slowly coming down to 10.65… until I had the PH meter incident and accidentally added too much calk. I added too much limestone and it was suddenly PH13 >> NOTE: for 30L, 30g of calk raises the PH for 1. as a rule of thumb, one should not add more than 30g of calk in one day (or until you see the effect). and it takes about 1 day to see the effect of calk.
>> 2nd NOTE: when the PH is too high, and we want to lower it, DO NOT MIX, and let the bacteria develop so they lower the PH. we did this opposite. when we had the PH too high, we mixed it even more, 3 times a day. In retrospect, we made it longer to lower the PH and also we exhausted ourselves as we had to go there very often. This was a big mistake and resulted in very long vat building process.
The summer here in Berlin was quite cool this year (2025). It rained regularly, and in July temperature stayed around 20 degrees, and even in August, it was dropping under 20 degrees often. For the first fermentation/vat building part, the vats needs at least 20 degrees, it seems. When looking at the log, when the temperature raise to 25 degrees, it starts to become active, PH drops, some sign of color…. then when the temperature drops, it goes back to quiet vat.
There was a tip from Melanie about the myth of full moon. It felt like the cycle of the moon is really affecting the vat activity. I did notice two times that when the full moon is there, the vat had the step for the next phase, or become very active, or gave a lot more color… so maybe this myth has some truth in it.
After 2 weeks or so, we saw the rainbow color patches. I am not sure if they were the sign of blue color, or it was something else. It looked different from the purple/copper color patch you see now on working vat, and I saw that rainbow patch when my vat at home was not working. I am suspecting that this rainbow patch is not a good sign?!
When the vat temperature dropped under 20 degrees (and cold summer nights) the vat surface started be covered with slimy gue, like Okura gue. I am not sure if this was some other bacteria growing, or something from wanted indigo vat bacteria reacting to cold temperature. When it became warmer and vat functioning again, the slime went away.
Something to consider for the next year vat building:
Start the first process of Sukumo mixing – Ash water quite hot. It should be definitely hotter than 50 degrees, and I think it could have been even hotter. I should also use NASA blanket and other heat keeping material around the vat for this part so it does not cool down easily. Also, if possible, pick a warm week to do this part.
Do not mix extra calk at the start steps. Check the PH when the ash water is added to the half point (30L). If it is really low, then add some calk to keep it above PH10.
If the temperature is not reliable, do the first part (until the 30L starts to show the sign of the color) at home, then bring the working vat to the garden. This may speed up the vat building phase. (although it feels like a cooking show cheat…)
Keep the log book more diligently. It will be also good to make the system to keep the color test fabric on the log book.