This week’s theme:
This week, we look into weaving technique as an example method to integrate electronics into materials. You can embed:
- conductive thread to embed LED or other types of connections
- conductive thread for heating element
- EL wire
- resistive thread/ yarn to make sensors
You can also try knitting, paper making, embedding in silicon.. so on.
Also, we will cover more complicated ways to control various light elements. We will go over LED matrix using charliePlexing, Addressable RGB LED and library from Adafruit and EL wires.
Assignment:
A prototype of an interactive light object.
by June 2nd (Monday)
LED matrix

tutorial >> http://web.media.mit.edu/~leah/grad_work/diy/diy_tank.html
CharliePlexing
“Charlieplexing is an ingenius method for controlling many LEDs without using many microcontroller pins. You can turn on or off one LED at a time. To light more than one LED at a time, you can scan the LEDs by turning a sequence of them on and off really fast. The number of LEDs you can control is determined by this formula: N pins * (N pins – 1). For example, if you have 4 pins, you can control 12 LEDs (4 pins * 3 pins). If you have 2 pins, you can control two LEDs, which makes it a little silly to employ Charlieplexing, since you could simply connect each LED to an MCU pin and then to ground. Charlieplexing makes more sense for more than two LEDs. Nine pins will get you 72 LEDs!”
from makezine
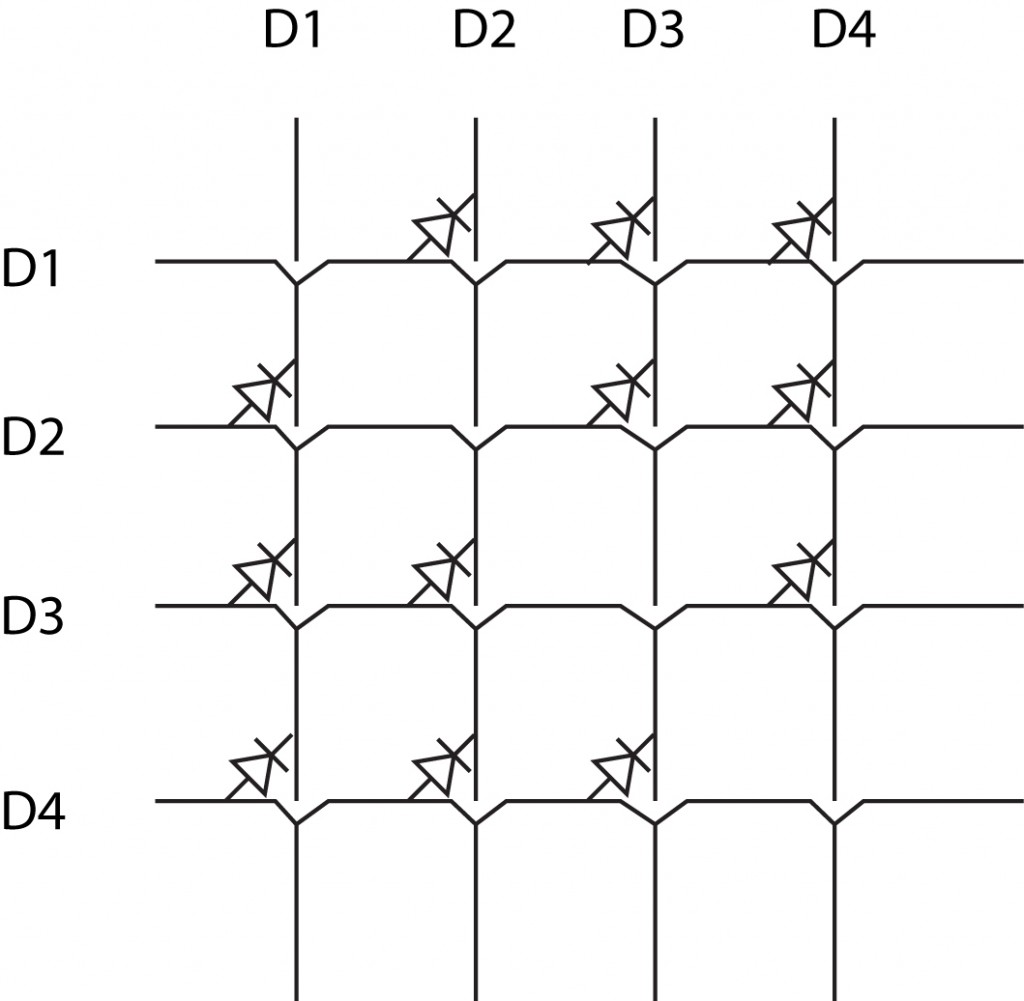

Alternatively you can use more pins to make cleaner matrix
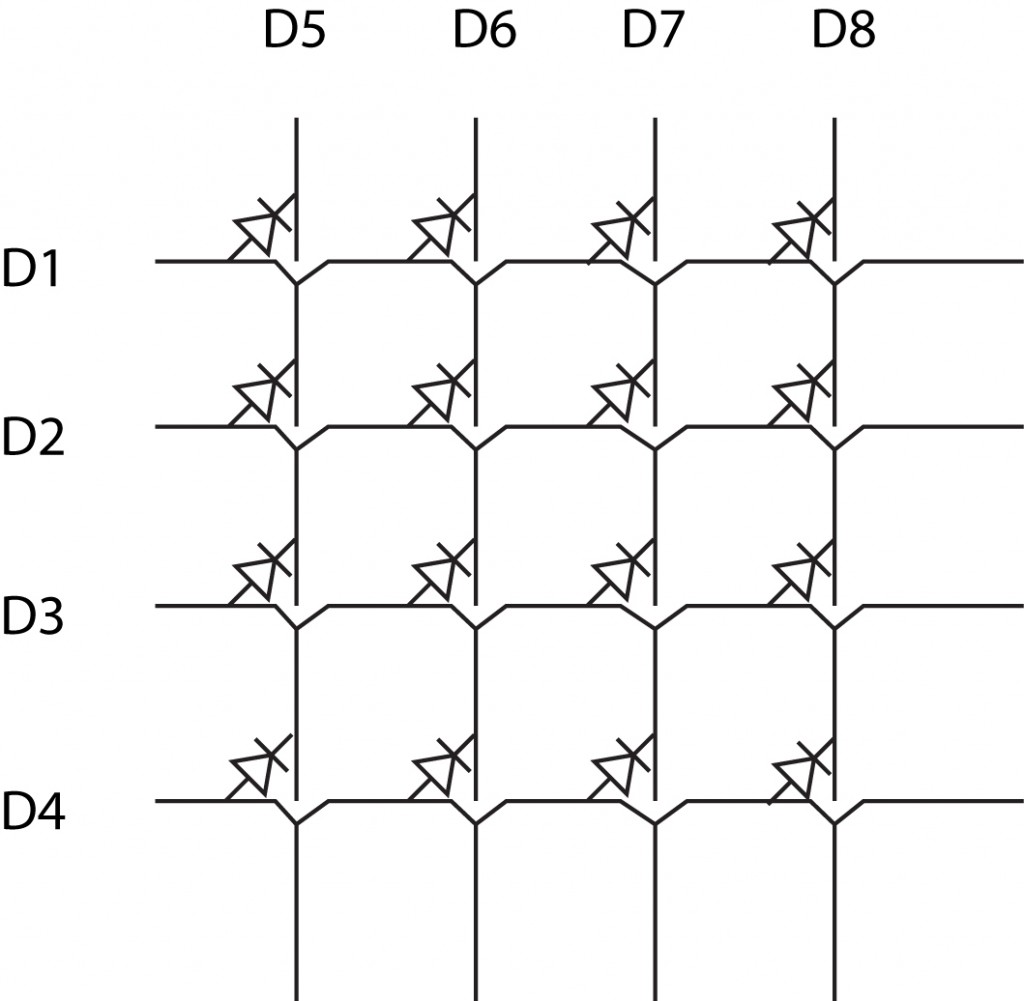
To control the matrix with Charlieplexing, there is a nice library for Arduino. You can download it from here.
http://playground.arduino.cc/Code/Charlieplex#Download
** note
We had problem compiling the example SimpleCharlie.pde
The solution for this was posted on this forum
http://forum.tiny-circuits.com/index.php?topic=232.0
Here is what you have to do:
-go to Document/ Arduino/ Libraries/ Charlieplex/ Charlieplex.h
-Open Charlieplex.h file with some kind of text editor
-Change “#include < wProgram.h >” to “#include < Arduino.h >”
-Save and close the file
Now if you try to compile the simpleCharlie.pde, should work.
What we did in the course: arduino sketch
https://github.com/mikst/101/tree/master/week6
BTW:
If you have a lot of LEDs, it is a pain to write int LEDpin1=3; int LEDpin2=4; …. and pinMode(LEDpin1,OUTPUT); pinMode(LEDpin2,OUTPUT); pinMode(LEDpin3,OUTPUT); …. so on.
You can avoid this by using array and for loop.
Addressable RGB LED


If you want to have a lot of RGB LED that change color individually, it is a pain to control each color from PWM pins. Instead, you can use Addressable RGB LED. This types of LED comes with small chip on LED and you can address which of the LED should be which color.
You can download Adafruit neoPixel library from here >> https://github.com/adafruit/Adafruit_NeoPixel
EL wire

“Electroluminescent wire (often abbreviated as EL wire) is a thin copper wire coated in a phosphor which glows when an alternating current is applied to it. It can be used in a wide variety of applications—vehicle and/or structure decoration, safety and emergency lighting, toys, clothing etc.—much as rope light or Christmas lights are often used. Unlike these types of strand lights, EL wire is not a series of points, but produces a 360 degree unbroken line of visible light. Its thin diameter makes it flexible and ideal for use in a variety of applications such as clothing or costumes.”
from wikipedia
The inside of the EL wire looks like this

To light up the EL wire, you need to provide high voltage high frequency AC current. You will need to use Inverter to power the EL wire.
If you cut the EL wire, you will need to reconnect the cable to core copper wire and thin copper wire. Here is a good tutorial on how to cut and prepare a new cable for EL wires.
>> https://learn.adafruit.com/el-wire/soldering-to-el-wire
You can weave or knit the EL wire to embed in textile. You can also braid the EL wire itself to create a structure.
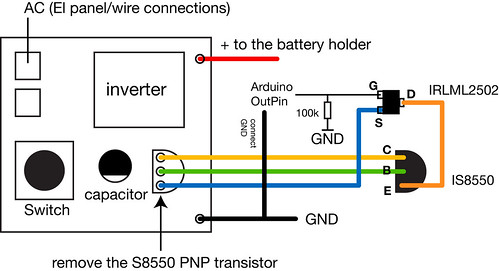
Now, if you want to control the EL wire from Arduino, it is a bit tricky as it is using High voltage AC. You can use TRIAC to switch on/off the AC, like you did with transistor switch, but if you want to fade the EL wire, you can not fade slowly with this method.
There is also an Arduino board dedicated for this purpose. It is called EL sequencer. But again, you can not fade the EL wire Slowly with the EL sequencer.
The alternative way to slowly fade the EL wire is to control the DC current going into the inverter.
See this tutorial >> http://www.kobakant.at/DIY/?p=4101
Double weave
You could embed conductive thread on warp and weft to create a matrix. But we have to take care that weft and warp conductive thread does not touch each other. Otherwise it is a shortcut.
To achieve this, we can use the weaving technique called “double weave”.

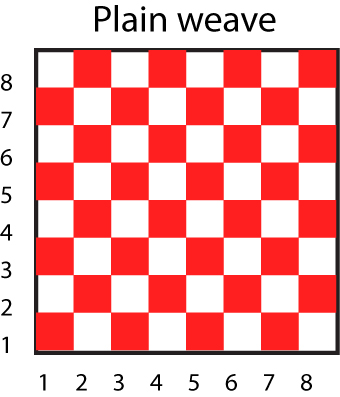
The normal plain weave looks like this

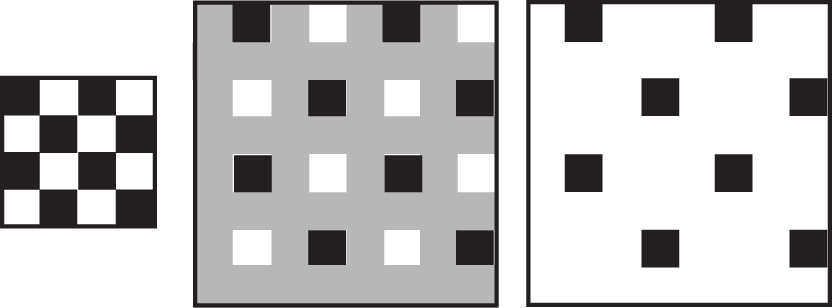
The double weave makes 2 layers of plain weave by separating the warp on add count and even count.
Here is how double weave works.

Step1:
we plan the layer 2 first. Spread the plain weave pattern on layer 2
Step2:
Now look at the layer 1 and spread the plain weave pattern. Then invert it as it will face the other side.
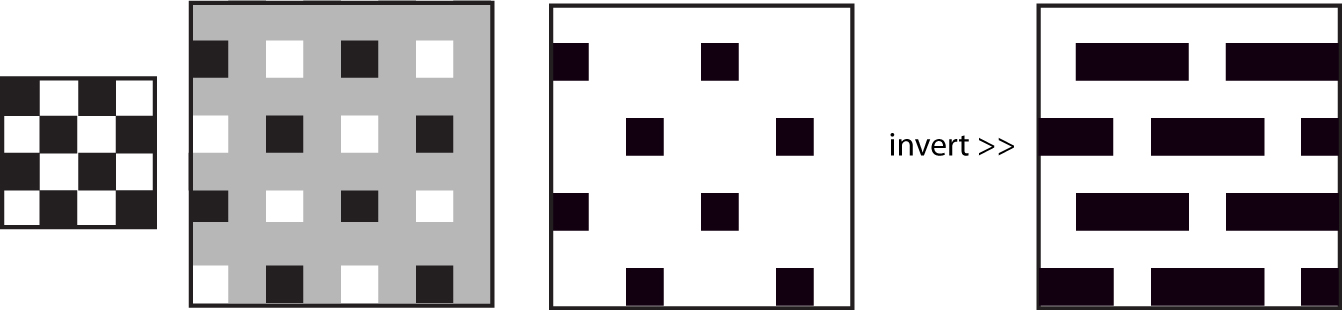
Step2:
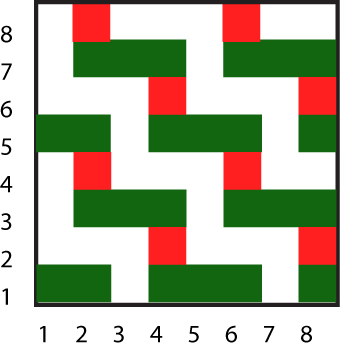
Marge the layer2 and layer1 in one pattern. You will need to use different weft thread (indicated with color) to achieve the layers.
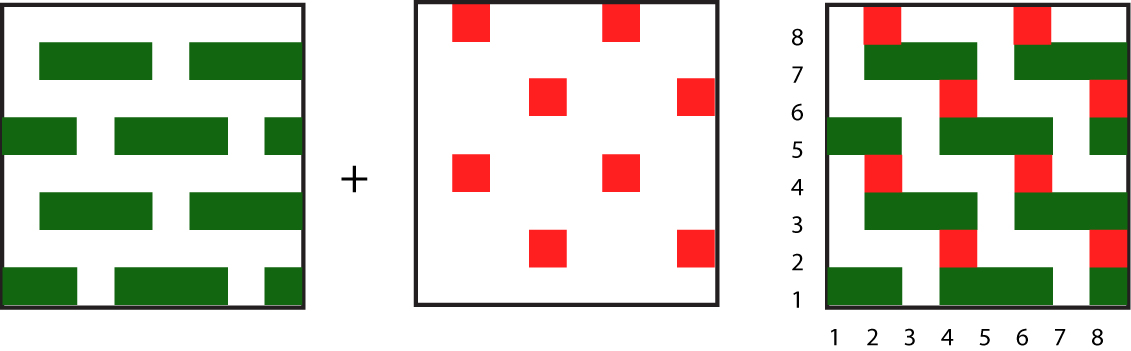
Here is the weaving pattern for double weave. You have to take care that the conductive thread on the warp is on 1 layer and the conductive thread weft goes on other layer. You need to insert the conductive thread weft only once and the rest of the layer can be woven with normal thread.
Other types of weaving pattern:
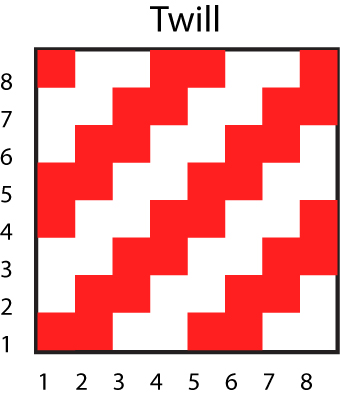
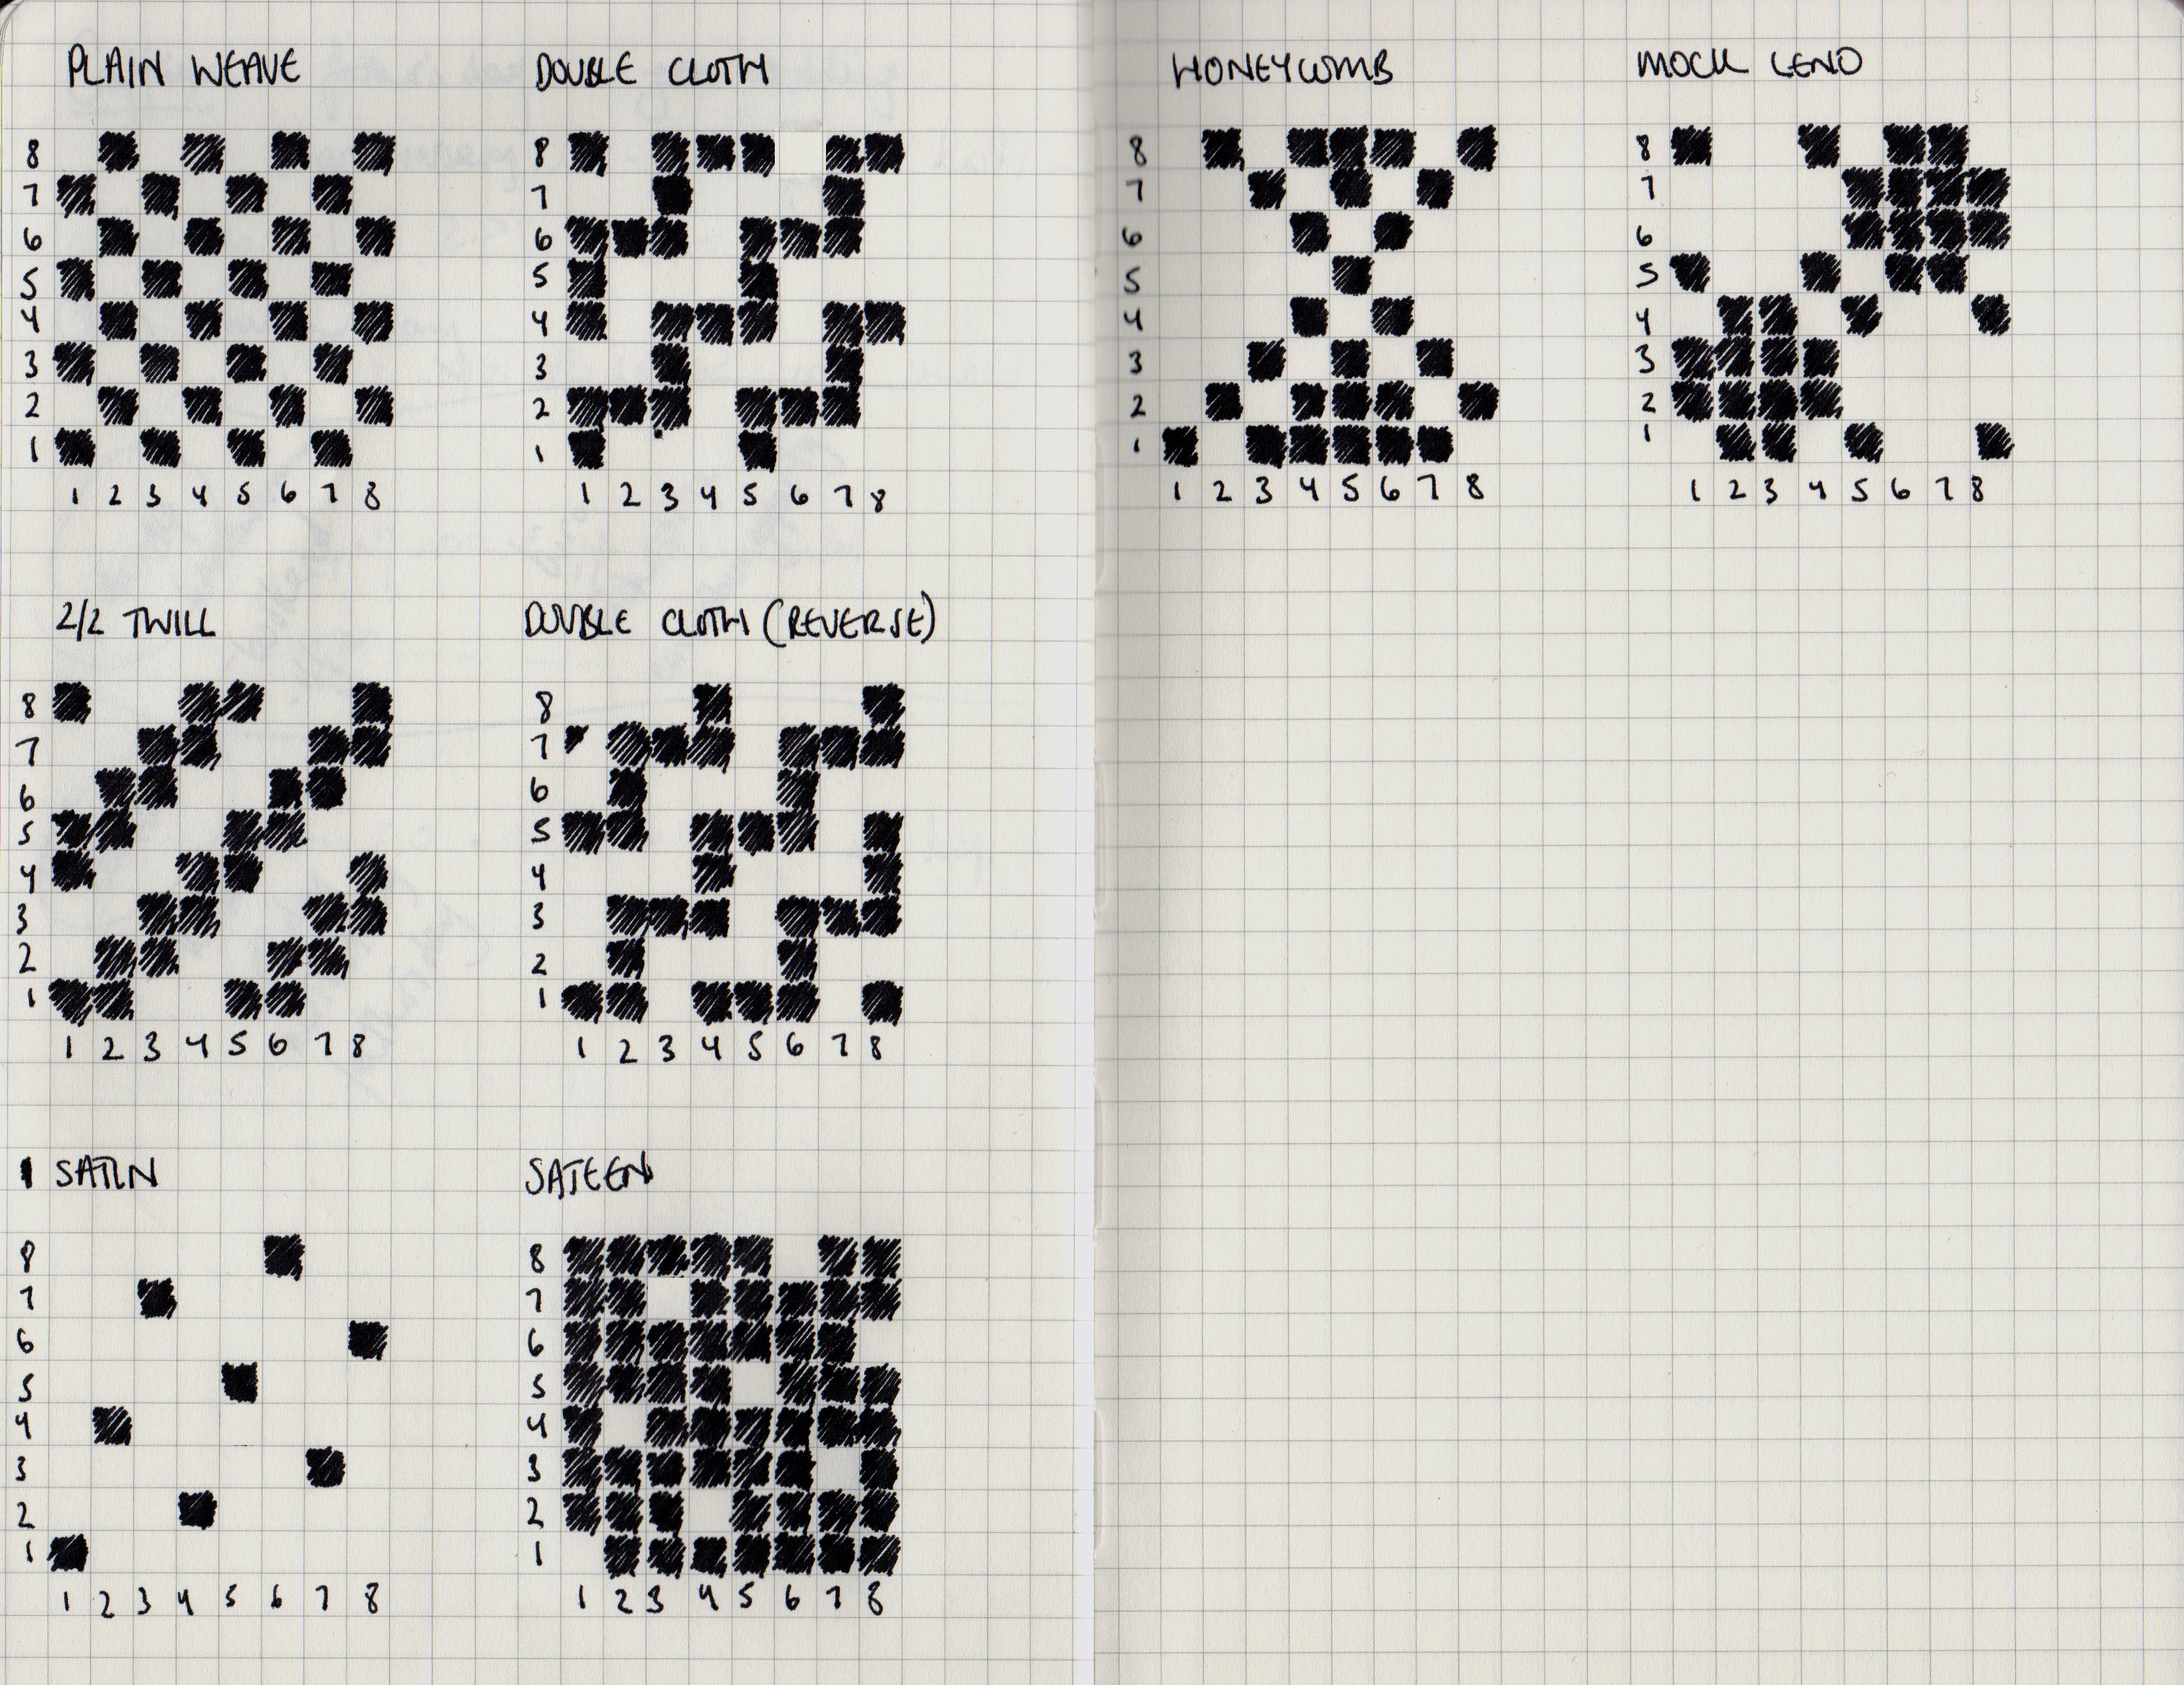
You can insert EL wire or single LED on conductive thread with these types of weaving pattern.
Noel and Emma Wood, a textile designer and my friend has helped me to set up the warp for the course.
Thanks!